Understanding Pod Scheduling in Kubernetes
Today, we will take a closer look at how Kubernetes pods are scheduled. Understanding the intricate process behind pod scheduling is crucial for optimizing resource allocation and achieving efficient cluster management.
When does pod scheduling occur? Pod scheduling takes place when you execute a rolling update, scale deployments, release a new version, or initiate a job or cron job. But have you ever wondered what exactly happens under the hood when you use 'kubectl apply'? Let's delve into the details.
For the purpose of this discussion, let's consider a sample pod.yaml file:
        apiVersion: v1

        kind: Pod

        metadata:

          name: pod-demo

        spec:

          containers:

            - name: webserver

              image: nginx

              ports:

                - name: webserver

                  containerPort: 80
To apply this YAML file, you can use the following command:
kubectl apply -f pod.yamlNow, let's explore the steps involved in pod scheduling:
Step 1: Storing the state in Etcd
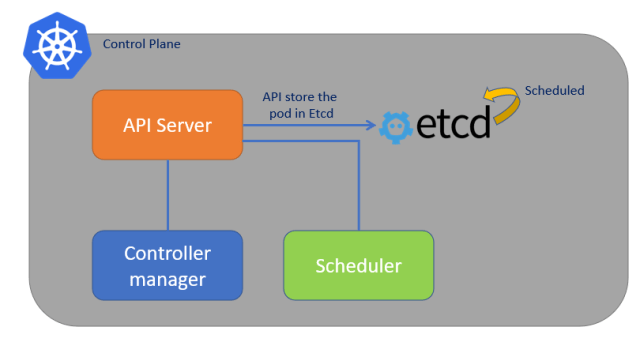
When you apply the pod definition, the API servers receive and inspect it. Simultaneously, the definition is stored in Etcd, and it gets added to the Scheduler's queue.
Once added to the schedule, the kube-scheduler evaluates the YAML file, considering resource requirements and other details, to determine the best node for running the pod. This selection process involves filters and predicates.
Finally, the pod is marked as scheduled, assigned to a specific node, and its state is stored in Etcd. At this stage, we have completed the initial phase, with all these actions taking place within the control plane or master node.
Step 2: The Role of the Kubelet
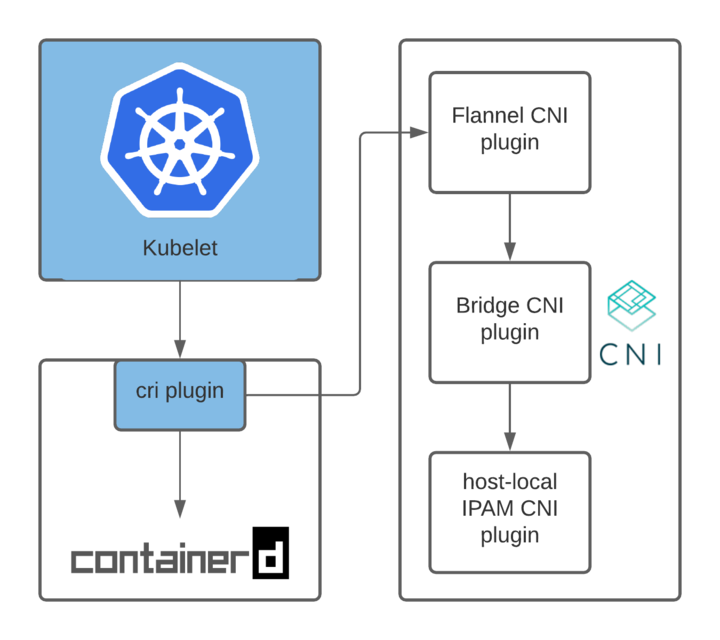
The kubelet, the Kubernetes agent running on each node, plays a vital role in pod creation.
When there is a pod to create, the kubelet retrieves the necessary details and proceeds with the creation process. However, the kubelet itself does not directly create the pod. Instead, it delegates the work to three critical components:
- The Container Runtime Interface (CRI): Responsible for creating the containers within the pod.
- The Container Network Interface (CNI): Connects the containers to the cluster network and assigns IP addresses.
- The Container Storage Interface (CSI): Handles volume mounting within the containers.
By leveraging these components, the kubelet orchestrates the creation of the pod, similar to how Docker operates with the 'docker run' command.
Step 3: The Pod Takes Its Place
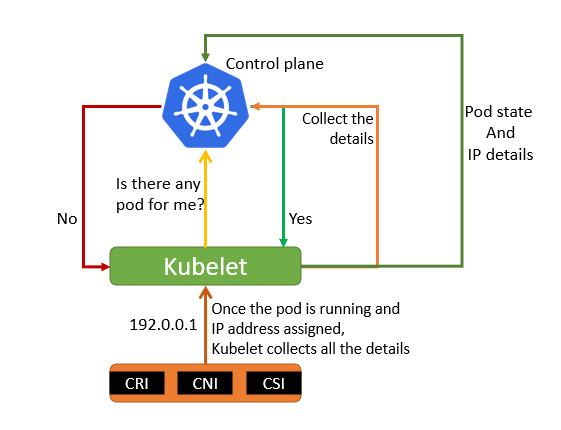
Once the pod creation process is complete, the Container Network Interface (CNI) comes into play. It generates a valid IP address for the pod and establishes the necessary network connections.
At this stage, the pod is connected to the network and assigned a valid IP address. However, it's important to note that the control plane or master node still perceives the pod creation as an ongoing process. The kubelet is responsible for gathering all the pod details, including the IP address, and reporting them back to the control plane, which stores this information in Etcd.
By querying Etcd, you can obtain the status and IP address details of the pod.
Conclusion
And there you have it! A comprehensive understanding of Kubernetes pod scheduling. By grasping the intricacies of this process, you can optimize your cluster's performance and troubleshoot any scheduling-related issues effectively. So, dive in, explore, and master the art of pod scheduling in Kubernetes!